Coiling involves rolling clay into long, snake-like ropes that are layered and smoothed to build forms, offering precise control over shape and thickness. Pinching shapes the clay by pressing and squeezing with fingers, ideal for creating small, organic forms quickly. Both techniques allow for creative expression but differ in complexity and structural possibilities.
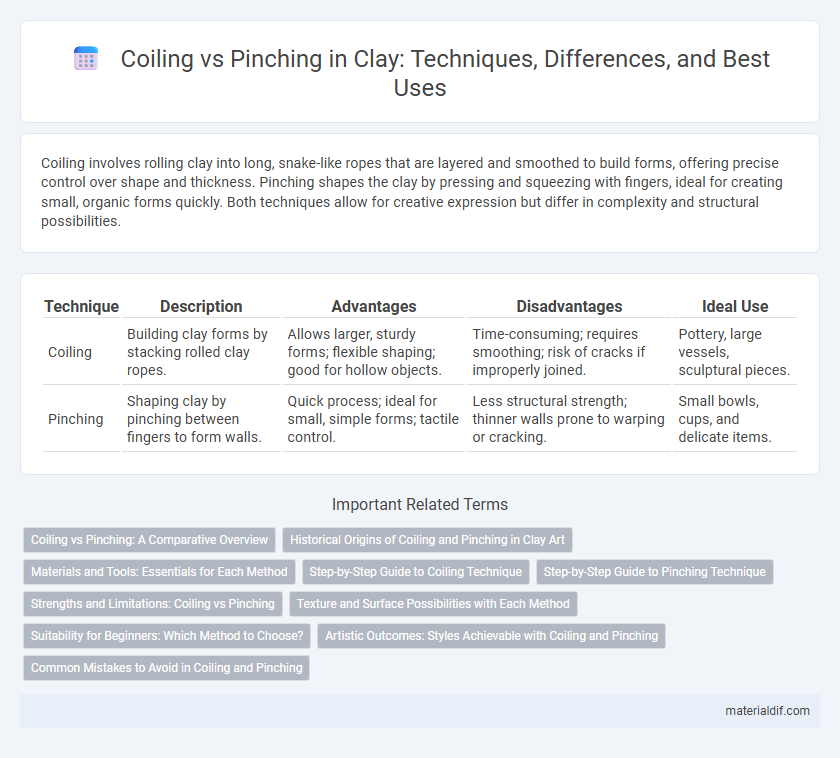
Table of Comparison
| Technique | Description | Advantages | Disadvantages | Ideal Use |
|---|---|---|---|---|
| Coiling | Building clay forms by stacking rolled clay ropes. | Allows larger, sturdy forms; flexible shaping; good for hollow objects. | Time-consuming; requires smoothing; risk of cracks if improperly joined. | Pottery, large vessels, sculptural pieces. |
| Pinching | Shaping clay by pinching between fingers to form walls. | Quick process; ideal for small, simple forms; tactile control. | Less structural strength; thinner walls prone to warping or cracking. | Small bowls, cups, and delicate items. |
Coiling vs Pinching: A Comparative Overview
Coiling and pinching are fundamental hand-building techniques in clay sculpture, each offering unique textural and structural benefits. Coiling involves rolling clay into long, snake-like strips stacked and smoothed to create vessels or forms with heightened flexibility and strength. Pinching uses the fingers to shape a ball of clay into hollow forms, providing greater control for smaller, delicate details and thinner walls.
Historical Origins of Coiling and Pinching in Clay Art
Coiling and pinching are ancient clay shaping techniques with distinct historical origins rooted in early human civilizations. Coiling originated around 10,000 years ago in prehistoric societies such as those in the Near East, where long rolled clay strands were layered to build pots, aiding the development of functional ceramics. Pinching, one of the most primitive methods, dates back to the Paleolithic era, evidenced by small hand-formed vessels created by early humans for everyday use.
Materials and Tools: Essentials for Each Method
Coiling requires long, pliable clay ropes and a flat surface for stacking and joining layers, with tools like wooden modeling sticks or ribs to smooth and blend coils seamlessly. Pinching uses a solid clay ball as the primary material and demands minimal tools, typically just the potter's hands, often supplemented by simple shaping tools or sponges for detail and surface refinement. Both techniques benefit from water or slip to maintain clay moisture and improve adhesion but differ significantly in material preparation and tool complexity.
Step-by-Step Guide to Coiling Technique
Start by rolling clay into long, even coils using consistent pressure to ensure uniform thickness throughout. Gradually layer and join the coils by scoring the surfaces and applying slip to secure strong bonds, preventing cracks during drying. Smooth the coils together with fingers or tools, creating seamless walls ideal for functional pottery and sculptural forms.
Step-by-Step Guide to Pinching Technique
Pinching is a fundamental hand-building technique in clay art where fingers shape the clay by squeezing it between the thumb and fingers. Start by rolling a small ball of clay, then insert your thumb into the center while gently pinching the walls evenly to form thin, uniform surfaces. Continue rotating the piece to maintain consistent thickness and smoothness for a balanced, functional vessel.
Strengths and Limitations: Coiling vs Pinching
Coiling in clay allows for building larger, more stable structures with greater control over thickness and shape, making it ideal for creating complex forms, but it requires more time and skill to join coils properly to avoid weaknesses. Pinching is faster and more intuitive, perfect for small, organic shapes, yet it limits the size and uniformity of the piece, often resulting in thinner walls prone to cracking. Both techniques demand careful moisture management to prevent structural failures during drying and firing.
Texture and Surface Possibilities with Each Method
Coiling clay allows for a textured surface with visible ridges and patterns formed by stacking and blending long, rolled strands, providing a dynamic tactile quality. Pinching creates a smoother, more organic surface with subtle variations due to finger pressure, enabling finer control over thin walls and delicate forms. Both methods offer unique surface possibilities, with coiling emphasizing structural texture and pinching highlighting fluid, intimate detail.
Suitability for Beginners: Which Method to Choose?
Coiling offers beginners greater control and precision, allowing them to build shapes gradually by stacking and smoothing rolled clay ropes, which enhances structural stability. Pinching is more intuitive and faster, ideal for those seeking immediate tactile engagement and simple forms without complex tools. Both methods develop foundational skills, but coiling is better suited for learners aiming to create larger, more detailed pieces, while pinching suits quick, small-scale projects.
Artistic Outcomes: Styles Achievable with Coiling and Pinching
Coiling allows artists to create intricate, textured forms with heightened structural integrity, making it ideal for large, complex vessels and sculptural works. Pinching produces organic, tactile surfaces suited for smaller, more intimate pieces, emphasizing spontaneity and subtle variations in thickness. Both techniques enable diverse stylistic expressions, with coiling favoring layered, geometric patterns and pinching promoting fluid, irregular shapes.
Common Mistakes to Avoid in Coiling and Pinching
Common mistakes in coiling clay involve uneven coil thickness, which can cause structural instability and cracking during drying or firing. In pinching, excessive pressure or uneven pinching can lead to weak spots and warping. Maintaining consistent coil size and gentle, uniform pinching ensures stronger and more durable ceramic pieces.
Coiling vs Pinching Infographic